If you are curious about Japanese comfort food, you should definitely try Omurice. The combination of fluffy eggs and flavorful rice might seem simple, but it offers a deep, satisfying taste that continues to captivate many people in Japan. Once you try it, you will surely be hooked as well.

Jump to:
What is Omurice?
Omurice is a Western-inspired Japanese dish made by either wrapping seasoned rice in an omelet or placing an omelet on top of the rice. “Omu” is a shortened form of the word "omelet" in Japanese. While buttered rice or pilaf is sometimes used for the rice portion, ketchup fried rice mixed with chicken and vegetables is the most common choice.
The biggest appeal of this dish is undoubtedly the texture of the omelet itself. Japanese omelets are known for being thick and fluffy. Since omelets come in many styles around the world, they might look different from what you are used to, but a Japanese-style omelet is essential for omurice. The soft, airy texture of the eggs paired with the flavorful rice is what makes omurice so special.
This post focuses specifically on how to make the omelet. In Japan, making an omelet is often considered a bit challenging, but I’ve included key tips to help even beginners create a beautiful one. No special Japanese ingredients are required—just follow the steps, and you can recreate this beloved dish in your own kitchen!
Preparing ketchup fried rice
Omurice consists of seasoned rice, an omelet, and sauce. The first step in making it is to prepare the rice.
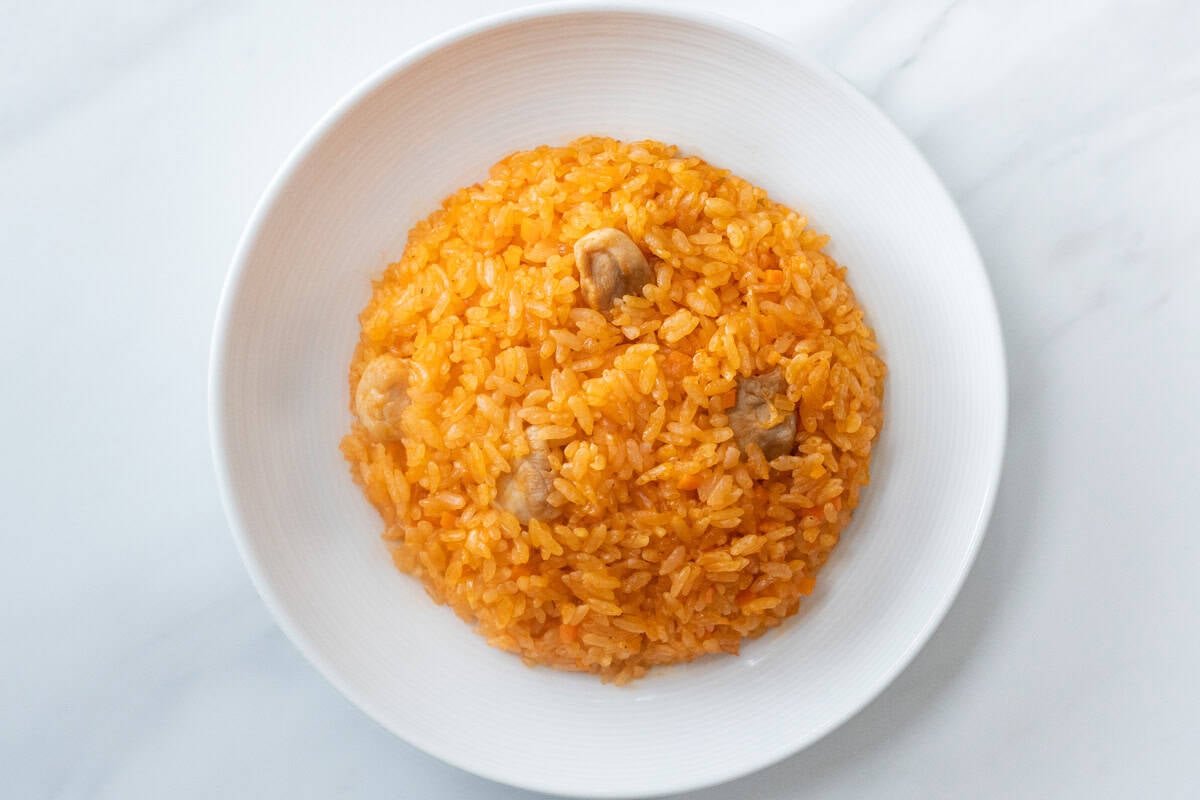
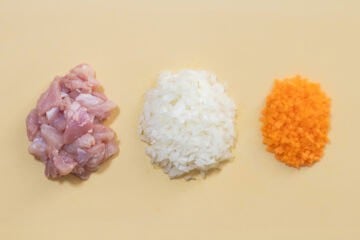
The rice commonly used for omurice is ketchup fried rice. Its bright color and the perfect combination of eggs and ketchup make it a popular choice. In Japan, this ketchup fried rice usually includes chicken, so it is known as "chicken rice" or simply "ketchup rice." The dish is typically made with the following ingredients:
- Cooked rice (warm)
- Chicken (boneless, skinless)
- Onions
- Carrots, green bell peppers, or mushrooms (optional)
The process is simple, with just four main steps:
- Prepare the ingredients
- Sauté the ingredients
- Add ketchup
- Mix the rice
In Japan, it is also common to enjoy ketchup fried rice on its own. The recipe below outlines the key steps, but if you want to learn more about Japanese ketchup fried rice, please refer to the linked page.
How to prepare the omelet
Once your ketchup fried rice is ready, it is time to make the omelet. Making a Japanese-style omelet requires cooking the eggs quickly and precisely within a short amount of time. That’s why it is crucial to have the steps clearly in mind before you start.
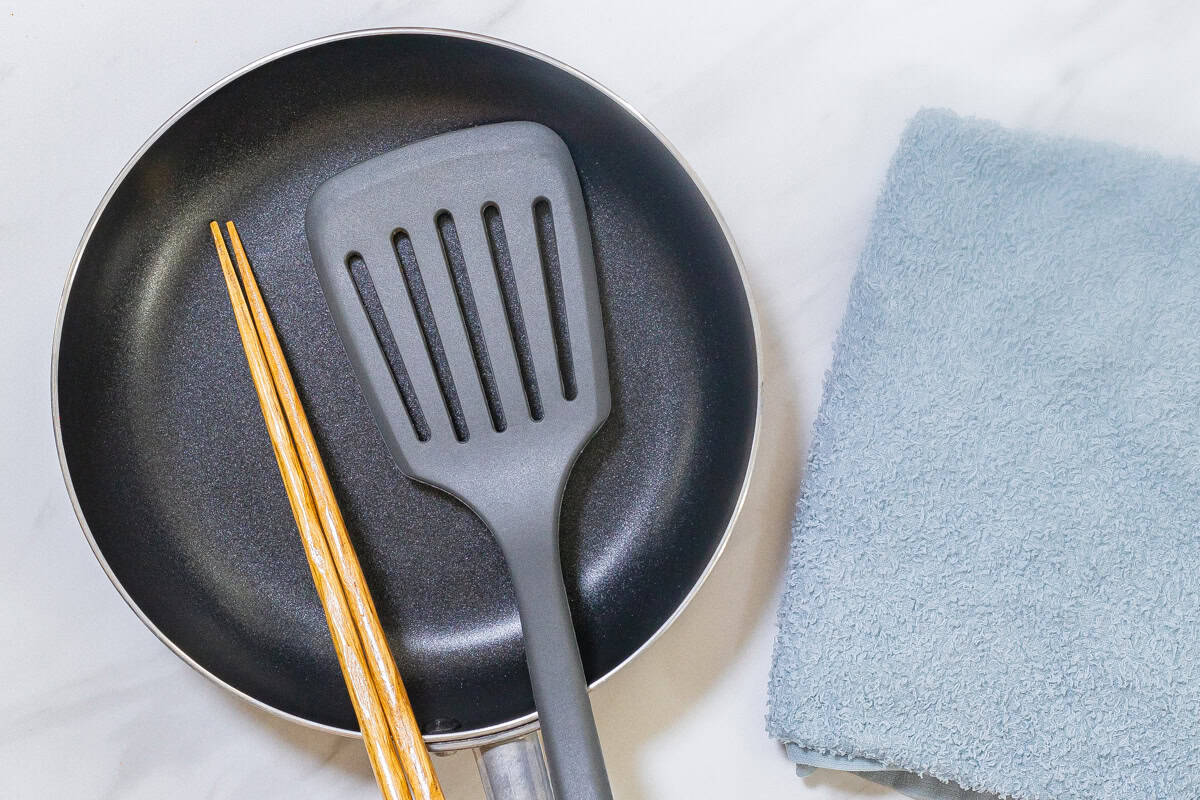
First, make sure you have the following tools prepared:
- A small frying pan (7-8 inches / 18-20 cm)
- Chopsticks
- A rubber or silicone spatula
- A damp cloth (to cool the pan while cooking the omelet)
In particular, using the right-sized frying pan can make or break the success of your omelet. If the pan is too large, the contact area between the eggs and the pan increases, causing the eggs to cook too quickly. This was also the main reason I used to struggle with making a good omelet.
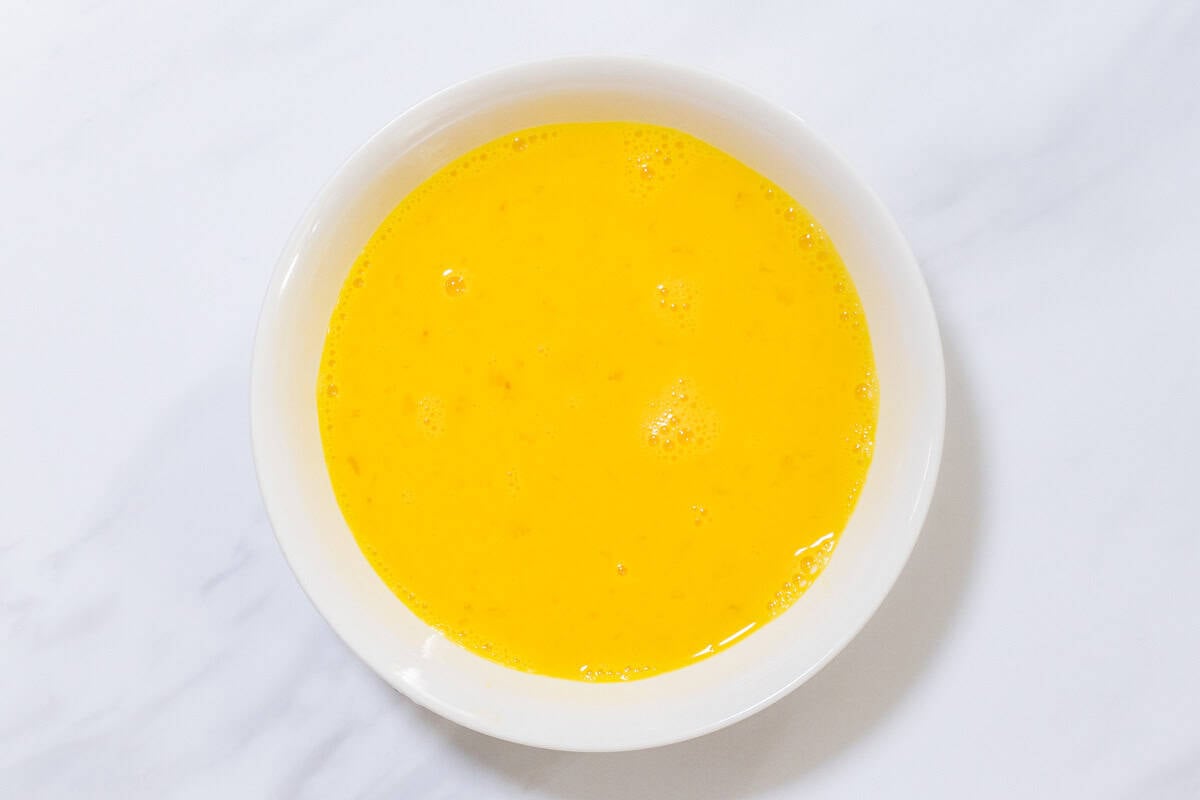
Once you have all your tools ready, crack the eggs into a bowl and whisk them thoroughly until there are no lumps of egg white. Eliminating these lumps helps prevent white streaks from appearing on the finished omelet.
Now, you are ready to start cooking your omelet.
Step-by-step guide to cooking the omelet
Let's move on to the process of cooking the omelet. There are many ways to cook an omelet, but here I will share a method that minimizes mistakes.
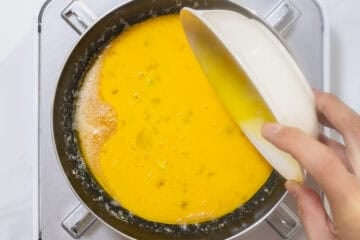
1. Heat butter in a pan over medium-low heat. Once the butter starts to melt, swirl the pan with your wrist so that the butter coats the entire surface, including the sides.
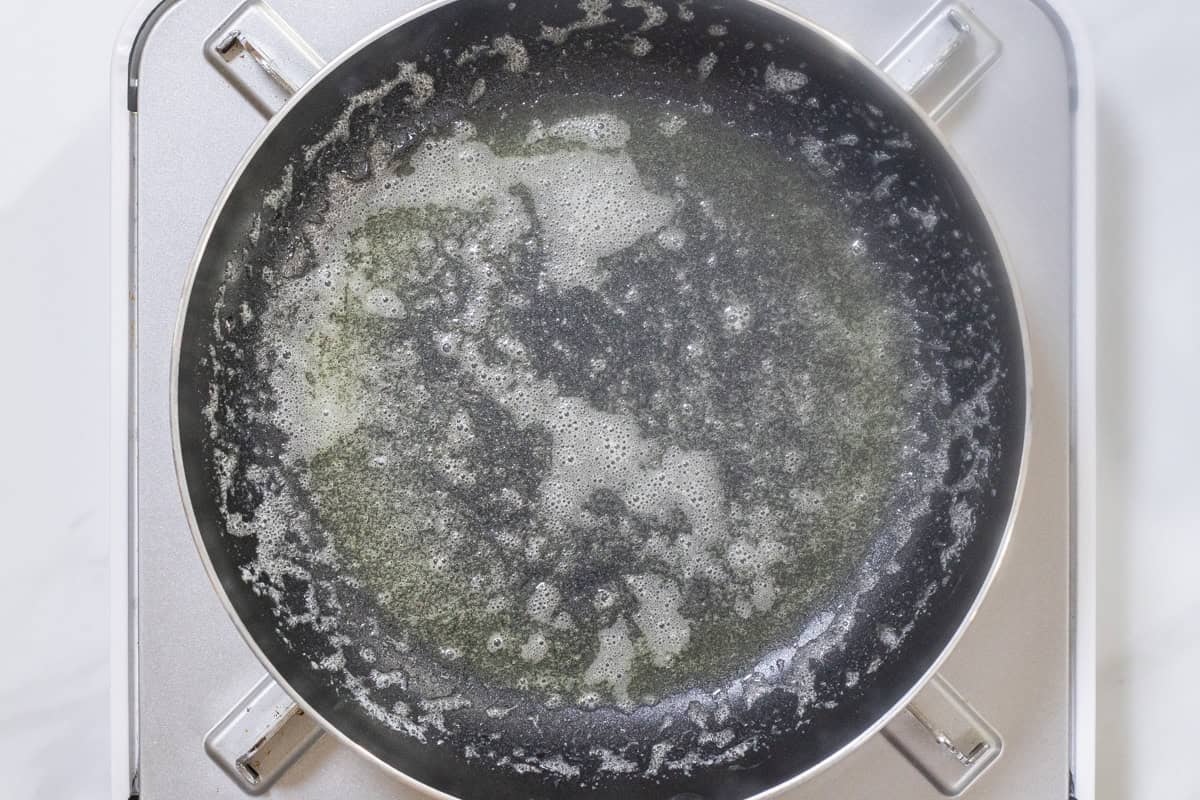
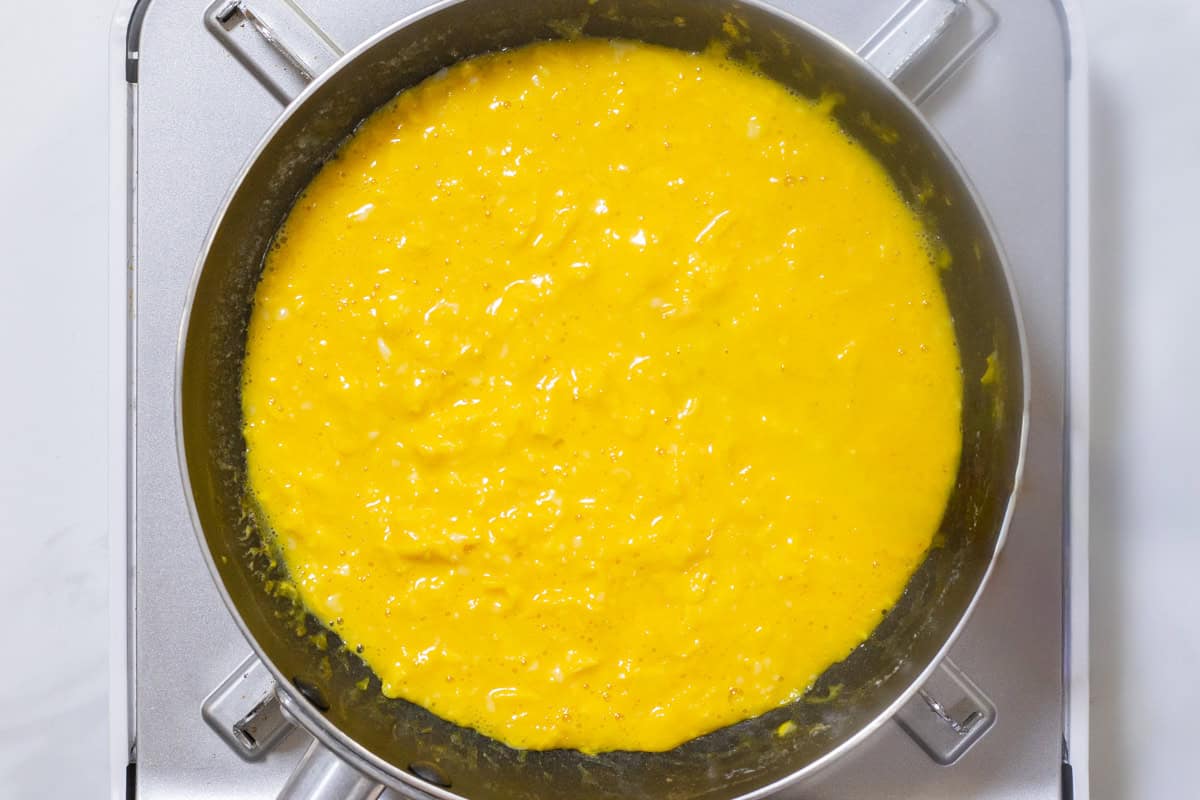
2. Once the butter has completely melted and the pan is evenly coated, pour in the beaten eggs.

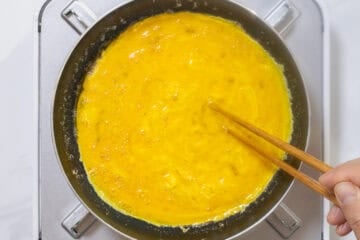
3. Hold chopsticks in your dominant hand and quickly stir the egg mixture, as if you were making very fine scrambled eggs. The eggs will start to set at the edges, so be sure to keep pushing the solidified parts toward the center. With your non-dominant hand, continue to shake the pan back and forth.
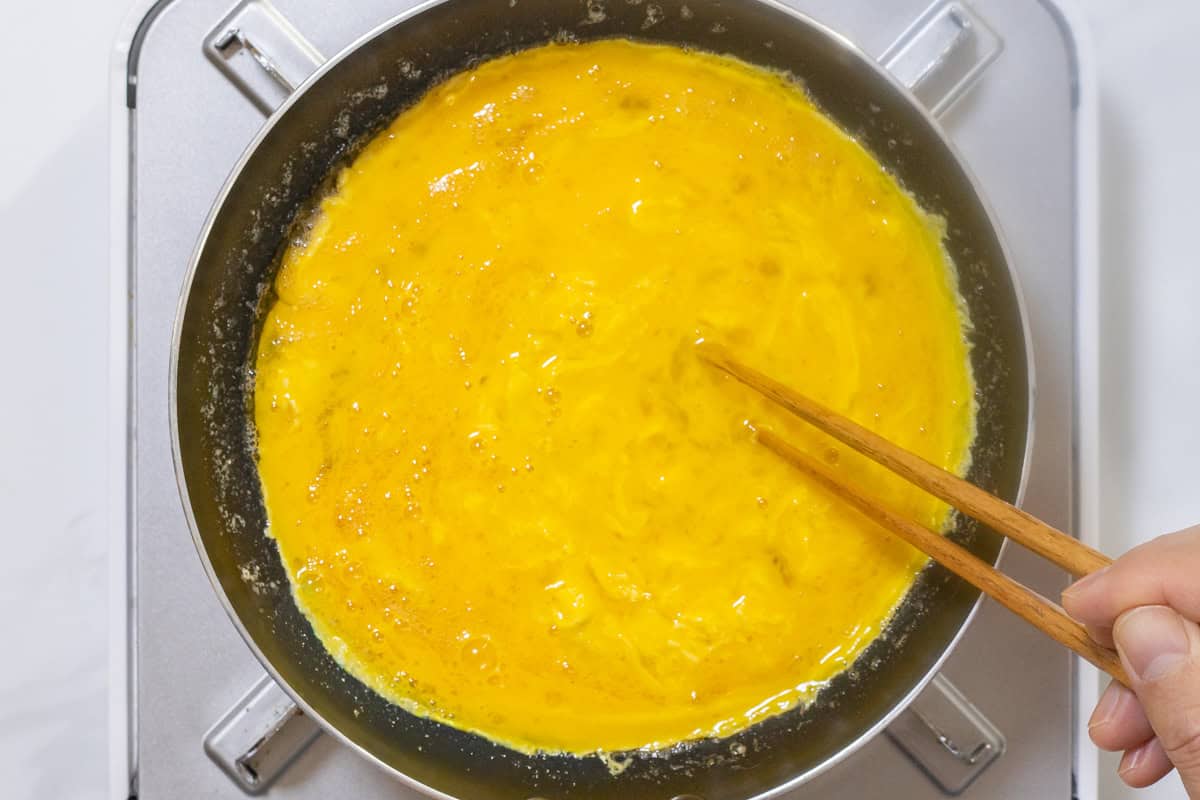
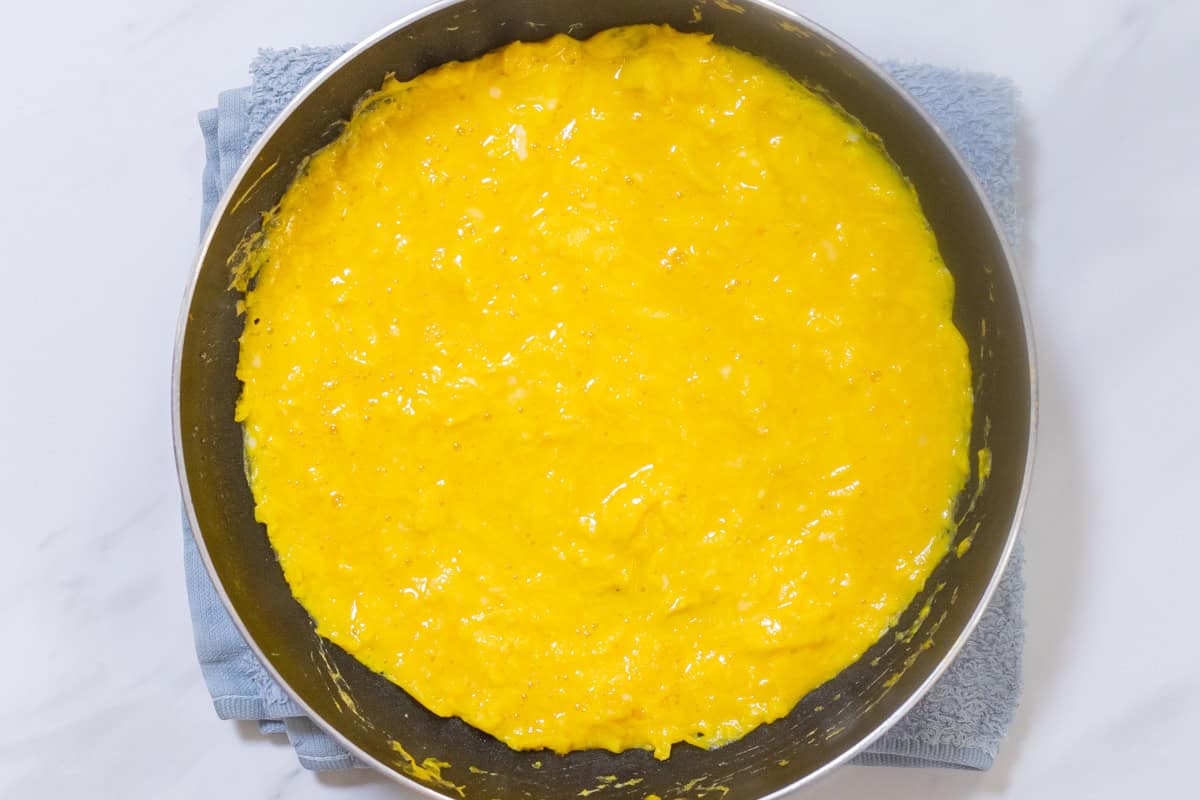
4. When the eggs are partially cooked and the bottom part doesn’t move much when you shake the pan, stop stirring for about 10 seconds to let the bottom cook. This allows a thin layer to form on the bottom.

5. Remove the pan from the heat and place it on a damp cloth to lower the pan's temperature. The eggs will continue to cook from the residual heat, so using the cloth helps slow that down. Turn off the heat for now.

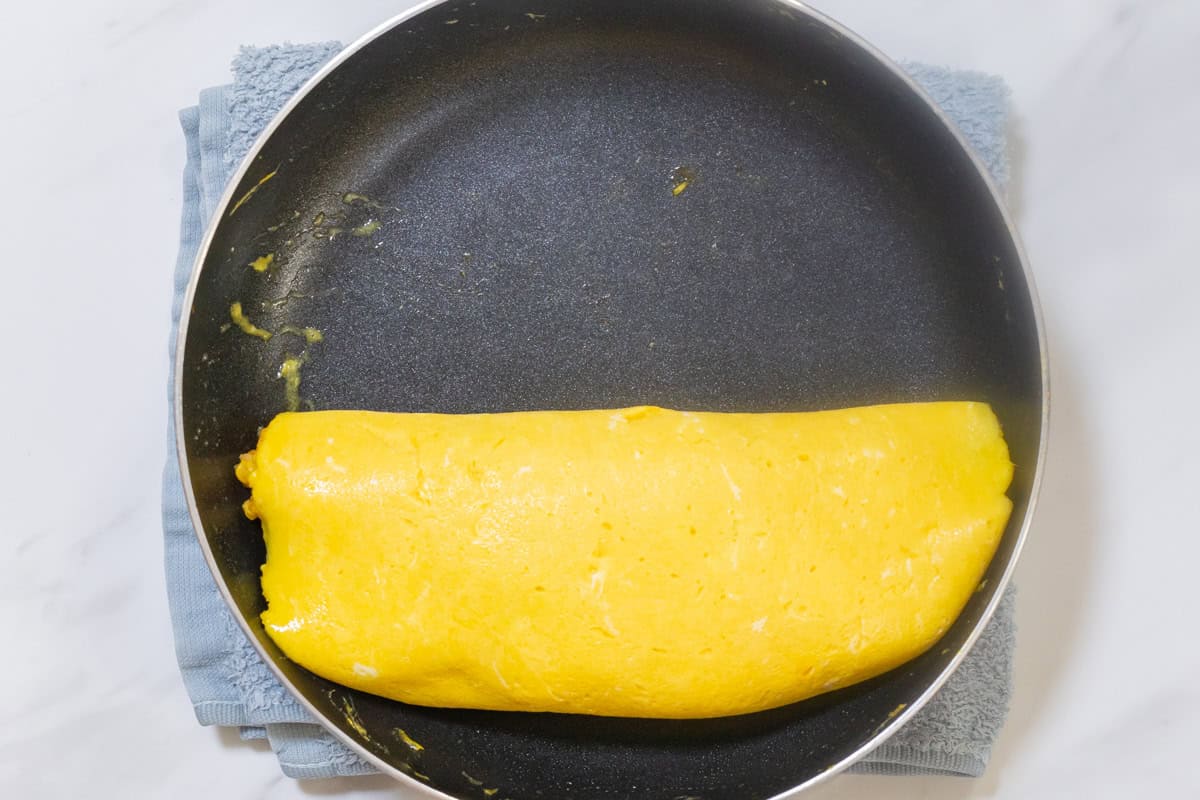
6. Place the ketchup fried rice in the center of the omelet, shaping it into a long, horizontal mound. Be sure to leave some space at both the front and back of the rice, as well as a little on the sides. This space will prevent the rice from spilling out when you fold the omelet.

7. Use a spatula to lift the far side of the omelet and fold it over the rice. Once it is covered, gently press the rice against the egg you just folded over.
8. Shake the pan to flip the rice and the back half of the omelet over the front half. Instead of just flipping your wrist, use your whole arm to give the pan a smooth shake—it will work much better this way. Then, use a spatula to gently shape the omelet.

9. Return the pan to the stove and cook the seam side over medium-low heat for about 10 seconds, and your omurice is ready.

The key points are using the right-sized pan and keeping steps 2-5 in mind so you can cook quickly. Always cook one serving at a time. The omelet for omurice generally doesn't contain any fillings mixed into the eggs.
A guide to omurice sauces
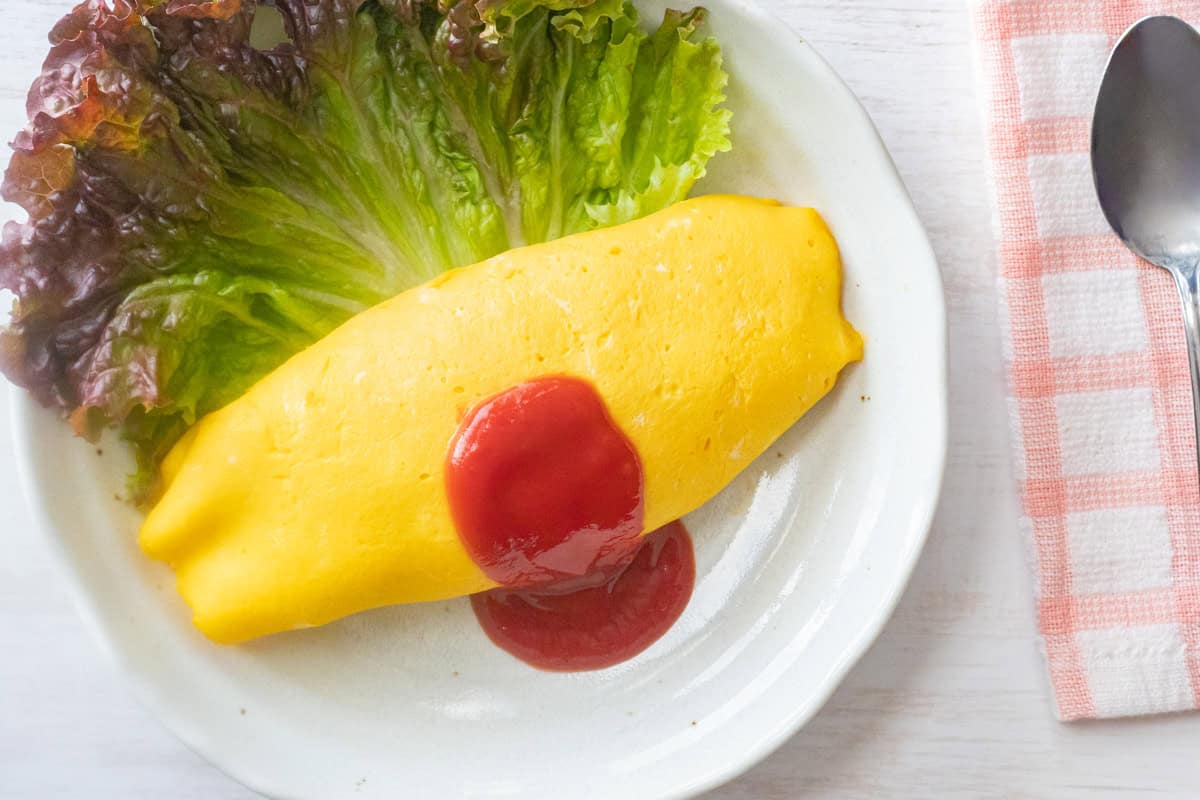
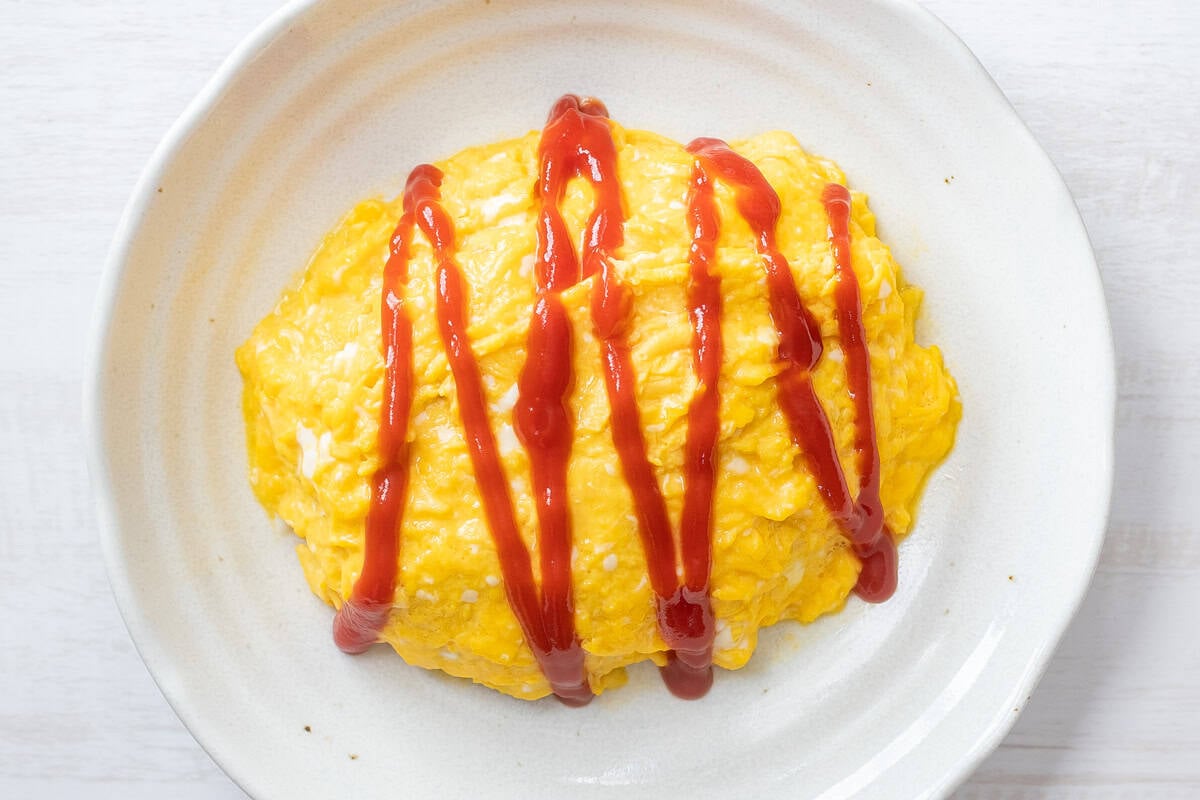
Once you have plated your omurice, all that's left to do is pour the sauce on top.
When making omurice at home, ketchup is the most commonly used condiment. You can pour it in one spot, as shown in the photos in this post, or drizzle it over the entire dish. In Japan, it is also a common practice to use ketchup to write messages like "love," "congratulations," "thank you," or "good job" on omurice and serve it to someone special.
If you are looking to experiment with the sauce, you can make a special version by heating ketchup with butter, or use demi-glace sauce or white sauce. Some people pour curry, hashed beef (the sauce used for hayashi rice), or beef stew over their omurice, creating dishes like "omu-curry," "omu-hayashi," or "omu-stew." The sauce can change the overall impression of the dish, so experimenting with different variations can be a lot of fun.

📋Step-by-step recipe
Equipment
- large pan
- small pan (7-8 inches / 18-20 cm) — important!
- chopsticks
- rubber or silicone spatula
- damp cloth
Ingredients
For the ketchup fried rice:
- 10.6 oz cooked Japanese short-grain rice (slightly less than 2 servings)
- 4.2 oz boneless, skinless chicken thigh
- 2.8 oz onion
- 1 oz carrot
- 2 tsp salted butter (0.17 oz/5 g per tsp)
- a pinch of salt (for the chicken)
- a pinch of ground black pepper (for the chicken)
- 4 Tbsp ketchup (0.6 oz/17 g per Tbsp)
- ¼ tsp salt
- a pinch of ground black pepper
For the omelet (each serving uses 3 eggs and 2 teaspoons of butter):
- 6 large eggs (about 2.1 oz/60 g each, including shell; if egg safety is a concern, use pasteurized eggs)
- 4 tsp salted butter (0.17 oz/5 g per tsp)
- ketchup (for topping)
Instructions
🕒 Total: 20 minsTo make ketchup fried rice:

Step 1
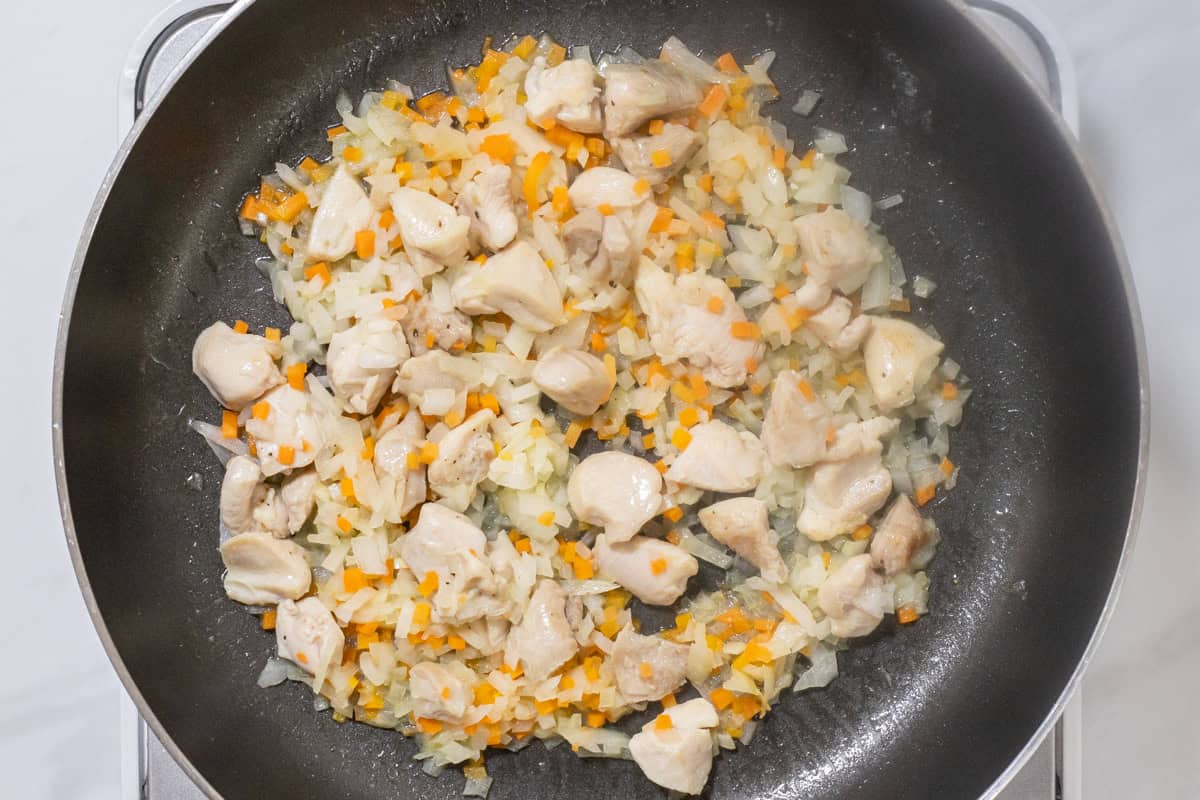
Cut the chicken into small pieces, about ½ inch (1-1.5 cm) thick. Finely chop the onion and carrot.
Step 2
Heat butter in a large pan. Once it has melted, add the chicken, season it with salt and pepper, and sauté over medium heat until both sides just start to change color. Then, add the onion and carrot, and cook until softened.

Step 3
Add ketchup to the pan and stir to coat the ingredients, cooking for about 1 minute to reduce the acidity.

Step 4
Add the cooked rice to the pan and stir-fry everything together, breaking up any clumps with a spatula. Once the ketchup is evenly incorporated into the rice, season with salt and pepper, and stir to combine.
To make omurice (cook one serving at a time):
Step 1
Crack the eggs into a bowl and whisk them thoroughly until there are no lumps of egg white.

Step 2
Heat butter in a small pan over medium-low heat. Once the butter starts to melt, use your wrist to swirl the pan so that the butter coats the entire surface, including the sides. Once the butter has completely melted and the pan is evenly coated, pour in the beaten eggs.

Step 3
Hold chopsticks in your dominant hand and quickly stir the egg mixture, as if you were making very fine scrambled eggs. The eggs will start to set at the edges, so be sure to keep pushing the solidified parts toward the center. With your non-dominant hand, continue to shake the pan back and forth.
Step 4
When the eggs are partially cooked and the bottom part doesn’t move much when you shake the pan, stop stirring for about 10 seconds to let the bottom cook.
Step 5
Remove the pan from the heat and place it on a damp cloth to lower the pan's temperature. Turn off the heat for now.

Step 6
Place the ketchup fried rice in the center of the omelet, shaping it into a long, horizontal mound. Be sure to leave some space at both the front and back of the rice, as well as a little on the sides.

Step 7
Use a spatula to lift the far side of the omelet and fold it over the rice. Once it is covered, gently press the rice against the egg you just folded over.
Step 8
Shake the pan to flip the rice and the back half of the omelet over the front half. Then, use a spatula to gently shape the omelet.

Step 9
Return the pan to the stove and cook the seam side over medium-low heat for about 10 seconds.

Step 10
Serve on a plate and top with ketchup.
To store
You can store it in the refrigerator for up to 2 days.

If you try this recipe, I’d love to hear what you think. Please consider leaving a review and star rating in the comments below. If you enjoyed it, I’d really appreciate it if you shared it with your friends.
Omurice with an omelet on top
The most common style of omurice is made by following the steps described above, but there is also a version in which the rice isn't wrapped in the egg. In this style, an omelet is placed on top of seasoned rice, and then a slit is cut in the center of the omelet. When the omelet is cut open with a knife, the soft, runny egg inside flows out, creating a visually striking presentation. For this reason, it is especially popular in restaurants.
The key feature of this style is the creamy, softly scrambled texture of the egg. Since the rice doesn't need to be wrapped in the egg, the omelet can be cooked to a runnier consistency. The preparation is almost the same as in the recipe above: instead of wrapping the rice in the egg, simply place the rice on a plate and set the omelet on top. Feel free to give it a try if you would like.
More egg recipes you'll love
Recipe card
Omurice (Japanese Omelette Rice)
Equipment
- large pan
- small pan (7-8 inches / 18-20 cm) — important!
- chopsticks
- rubber or silicone spatula
- damp cloth
Ingredients
For the ketchup fried rice:
- 10.6 oz cooked Japanese short-grain rice (slightly less than 2 servings)
- 4.2 oz boneless, skinless chicken thigh
- 2.8 oz onion
- 1 oz carrot
- 2 tsp salted butter (0.17 oz/5 g per tsp)
- a pinch of salt (for the chicken)
- a pinch of ground black pepper (for the chicken)
- 4 Tbsp ketchup (0.6 oz/17 g per Tbsp)
- ¼ tsp salt
- a pinch of ground black pepper
For the omelet (each serving uses 3 eggs and 2 teaspoons of butter):
- 6 large eggs (about 2.1 oz/60 g each, including shell; if egg safety is a concern, use pasteurized eggs)
- 4 tsp salted butter (0.17 oz/5 g per tsp)
- ketchup (for topping)
Instructions
To make ketchup fried rice:
- Cut the chicken into small pieces, about ½ inch (1-1.5 cm) thick. Finely chop the onion and carrot.

- Heat butter in a large pan. Once it has melted, add the chicken, season it with salt and pepper, and sauté over medium heat until both sides just start to change color. Then, add the onion and carrot, and cook until softened.
- Add ketchup to the pan and stir to coat the ingredients, cooking for about 1 minute to reduce the acidity.
- Add the cooked rice to the pan and stir-fry everything together, breaking up any clumps with a spatula. Once the ketchup is evenly incorporated into the rice, season with salt and pepper, and stir to combine.


To make omurice (cook one serving at a time):
- Crack the eggs into a bowl and whisk them thoroughly until there are no lumps of egg white.
- Heat butter in a small pan over medium-low heat. Once the butter starts to melt, use your wrist to swirl the pan so that the butter coats the entire surface, including the sides. Once the butter has completely melted and the pan is evenly coated, pour in the beaten eggs.
- Hold chopsticks in your dominant hand and quickly stir the egg mixture, as if you were making very fine scrambled eggs. The eggs will start to set at the edges, so be sure to keep pushing the solidified parts toward the center. With your non-dominant hand, continue to shake the pan back and forth.
- When the eggs are partially cooked and the bottom part doesn’t move much when you shake the pan, stop stirring for about 10 seconds to let the bottom cook.
- Remove the pan from the heat and place it on a damp cloth to lower the pan's temperature. Turn off the heat for now.
- Place the ketchup fried rice in the center of the omelet, shaping it into a long, horizontal mound. Be sure to leave some space at both the front and back of the rice, as well as a little on the sides.
- Use a spatula to lift the far side of the omelet and fold it over the rice. Once it is covered, gently press the rice against the egg you just folded over.
- Shake the pan to flip the rice and the back half of the omelet over the front half. Then, use a spatula to gently shape the omelet.
- Return the pan to the stove and cook the seam side over medium-low heat for about 10 seconds.
- Serve on a plate and top with ketchup.


Notes
- You can store it in the refrigerator for up to 2 days.


Leave a Rating and a Comment